
Technology Happy Challenge

Mini Cardboard Skate Ramp
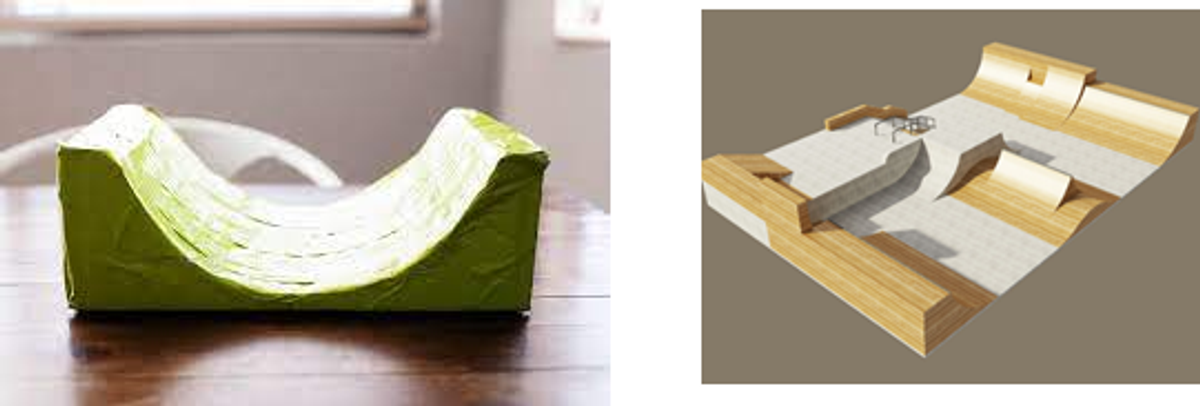
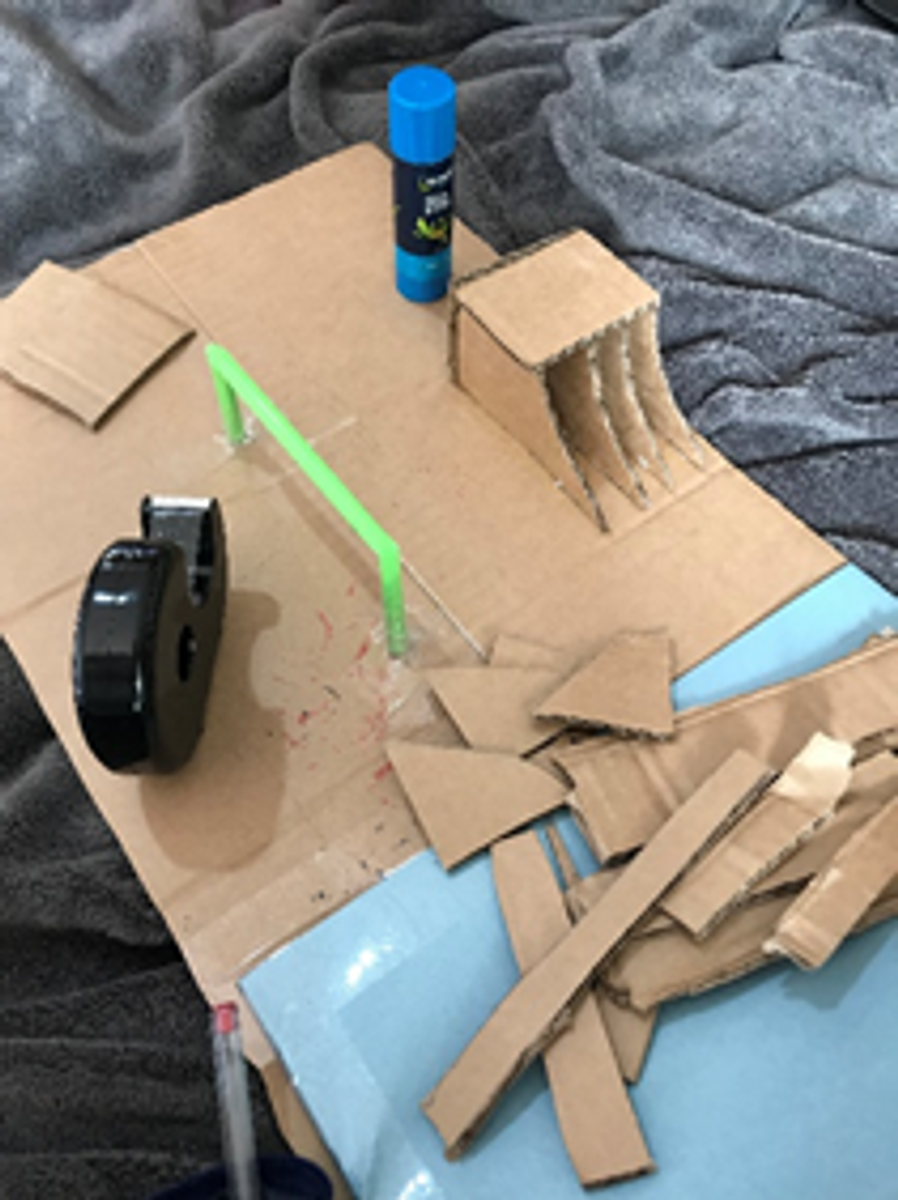
Research/Tools/Materials Required
- Cardboard
- 1 straw
- Paper
- Sticky Tape
- Glue
- Stanley Knife
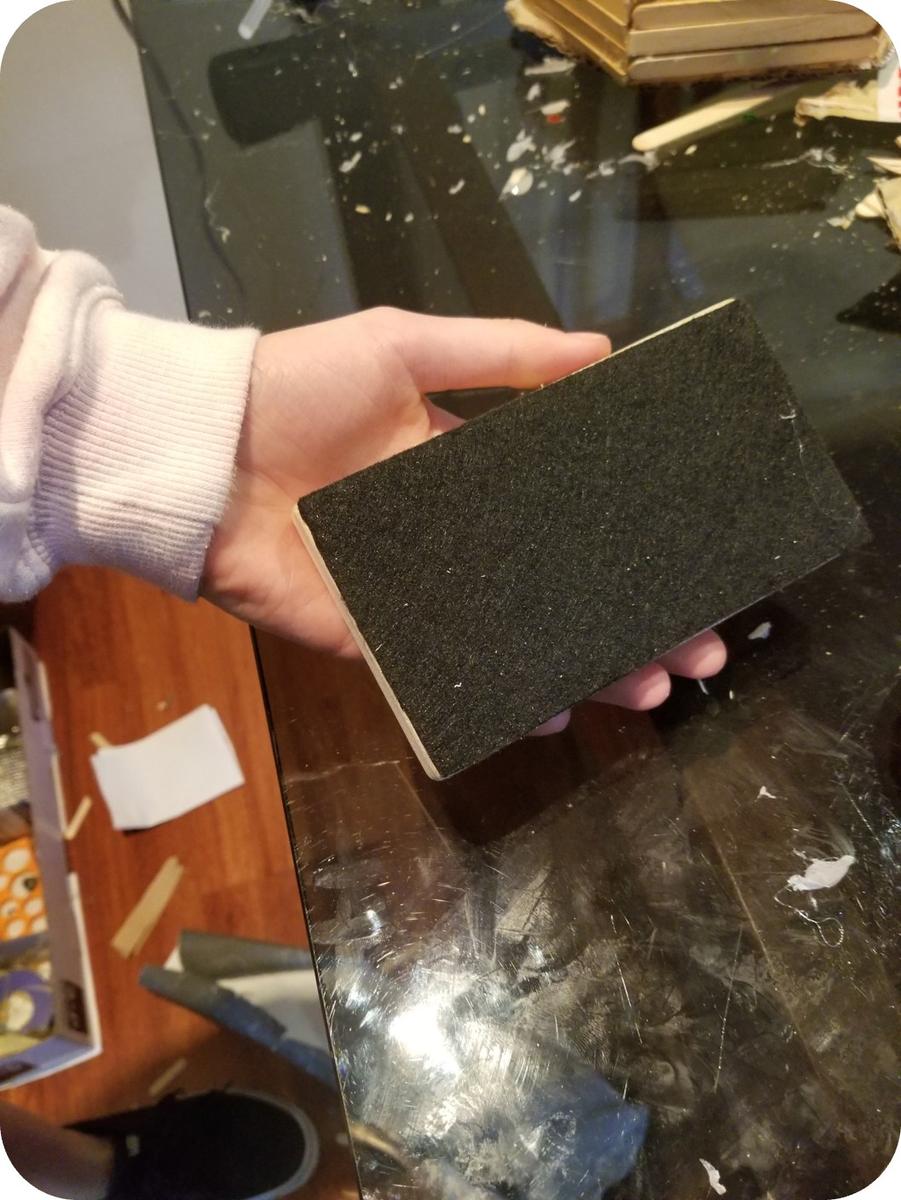
- Scissors
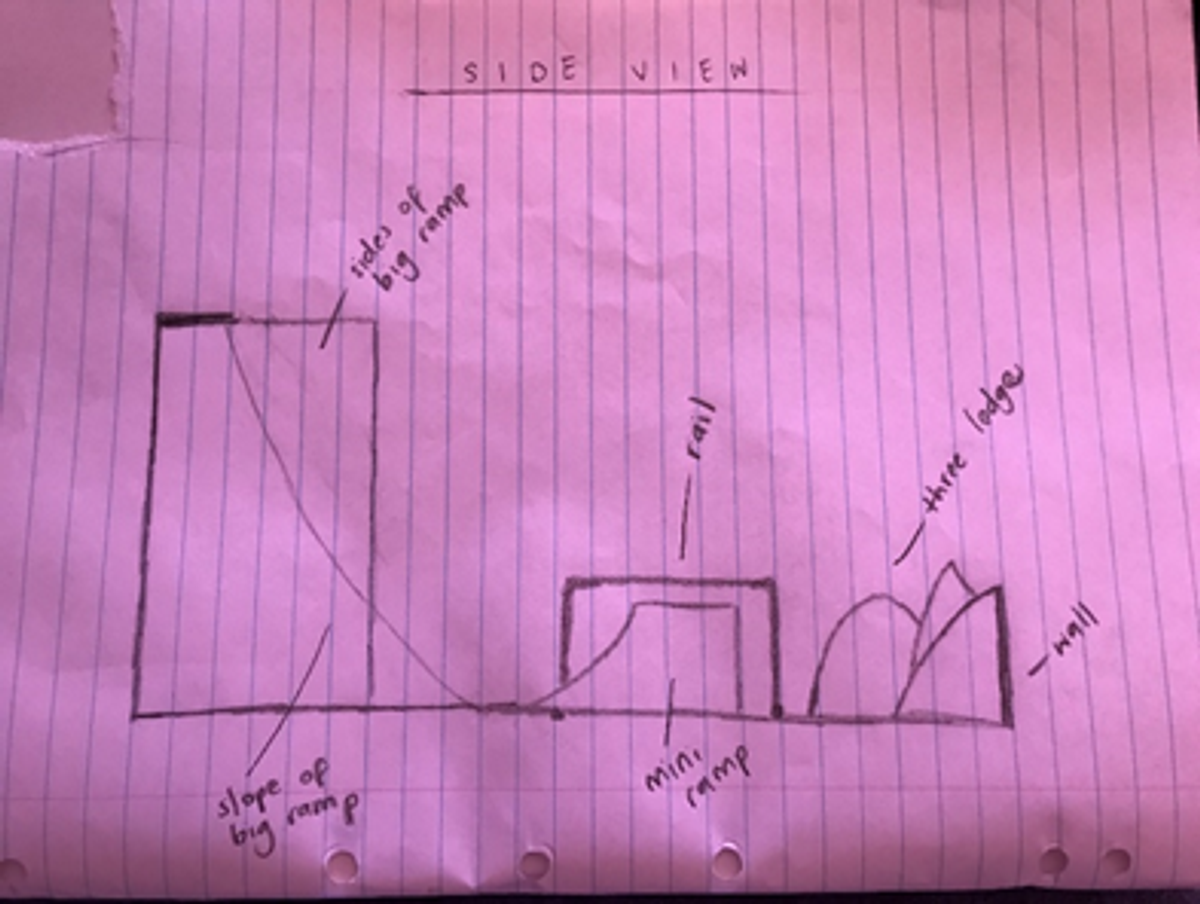
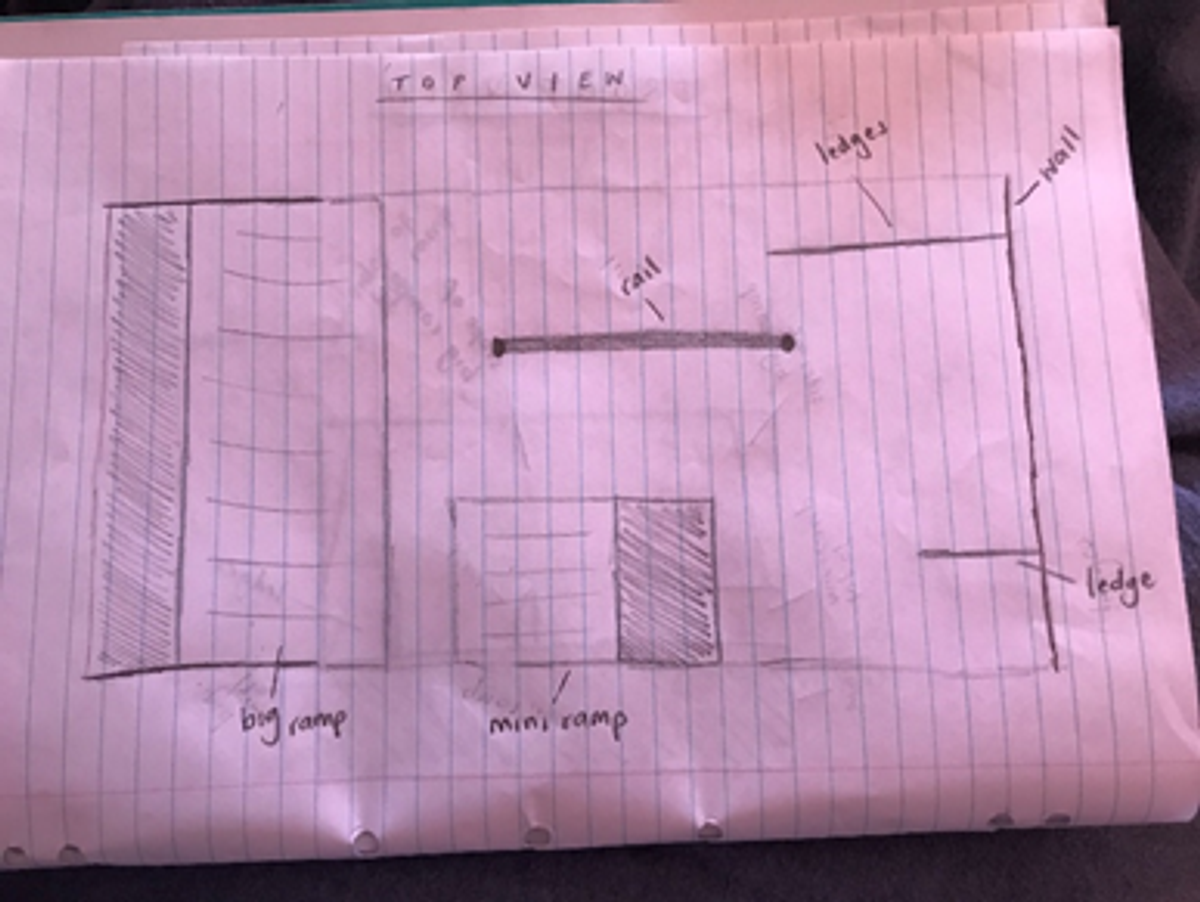
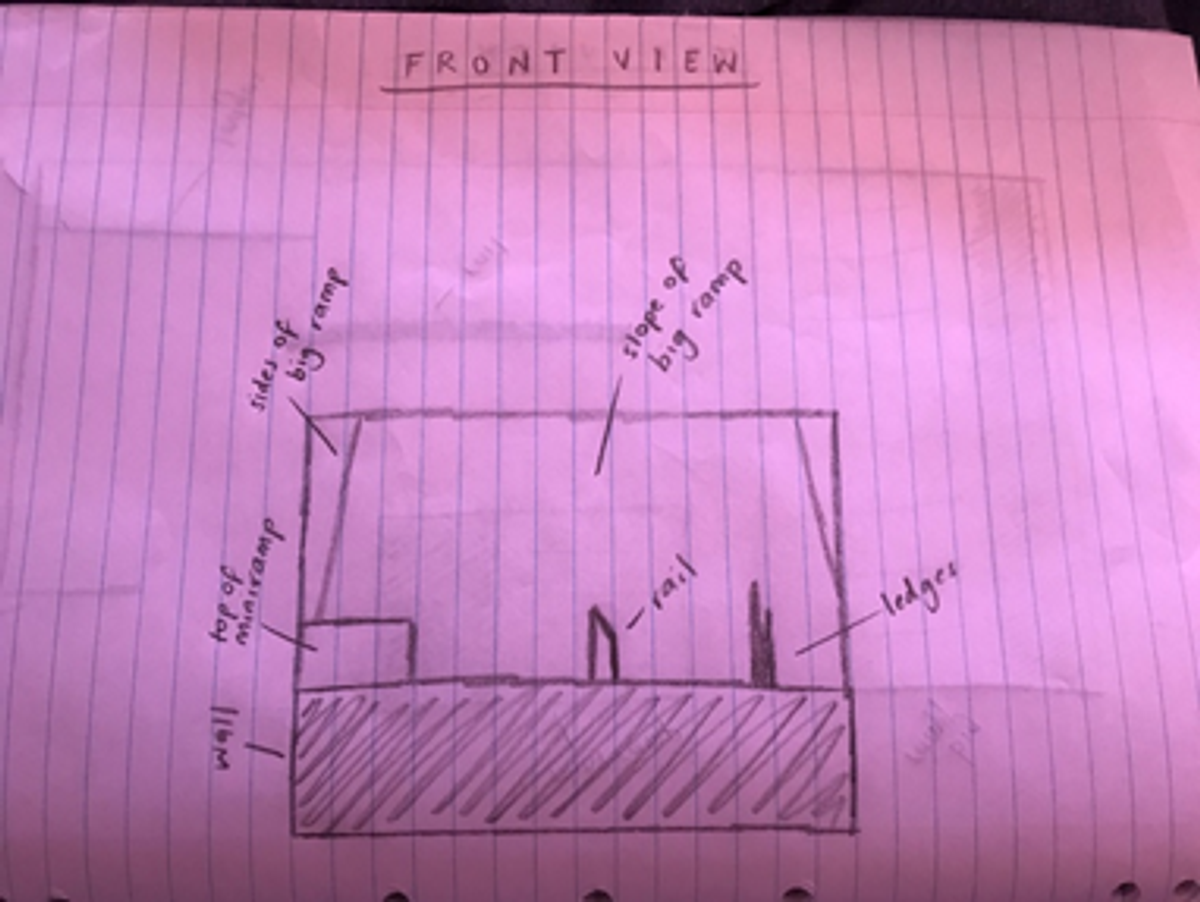
Pencil Sketches
Production Plan
- Gather all materials and equipment – a lot of cardboard, one straw, 4 pieces of paper, sticky tape, glue, Stanley knife (if don’t have Stanley knife, just use scissors), scissors.
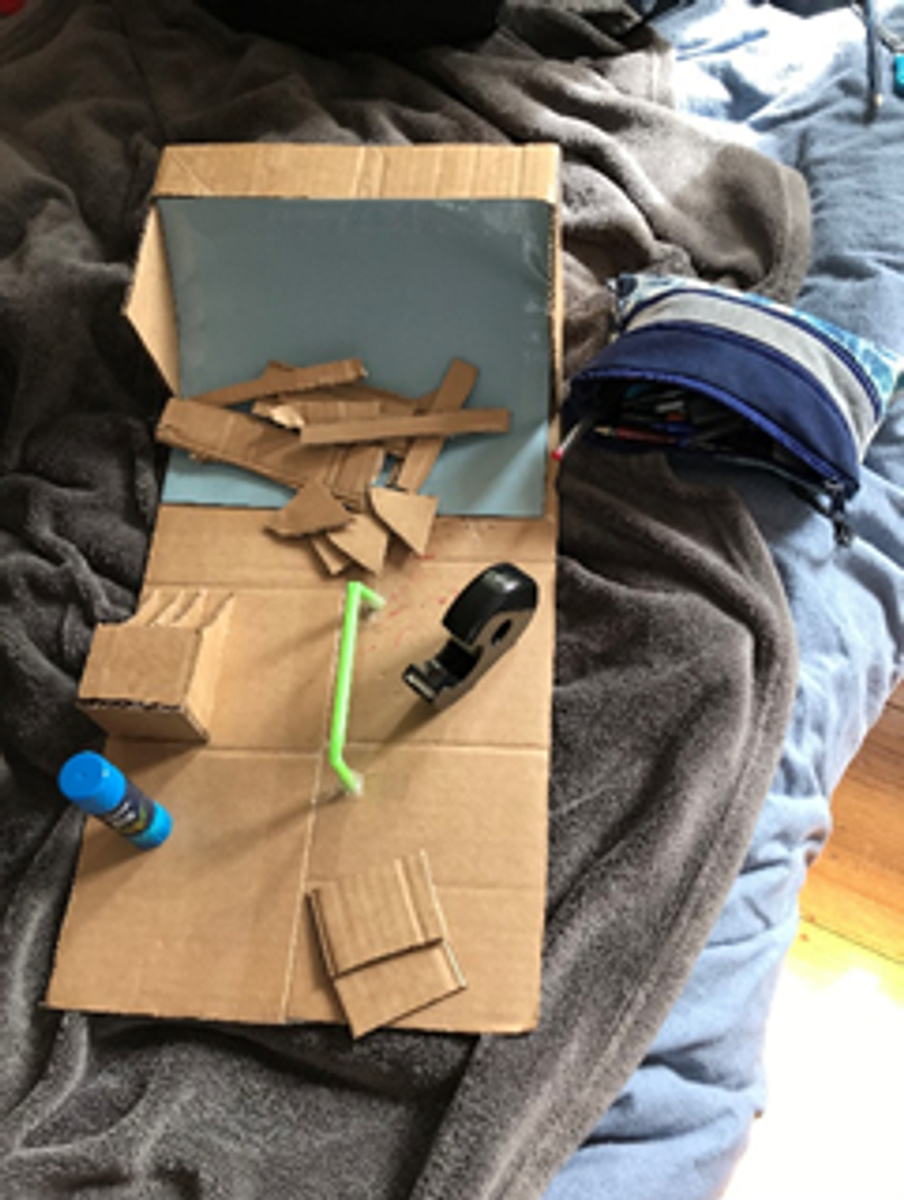
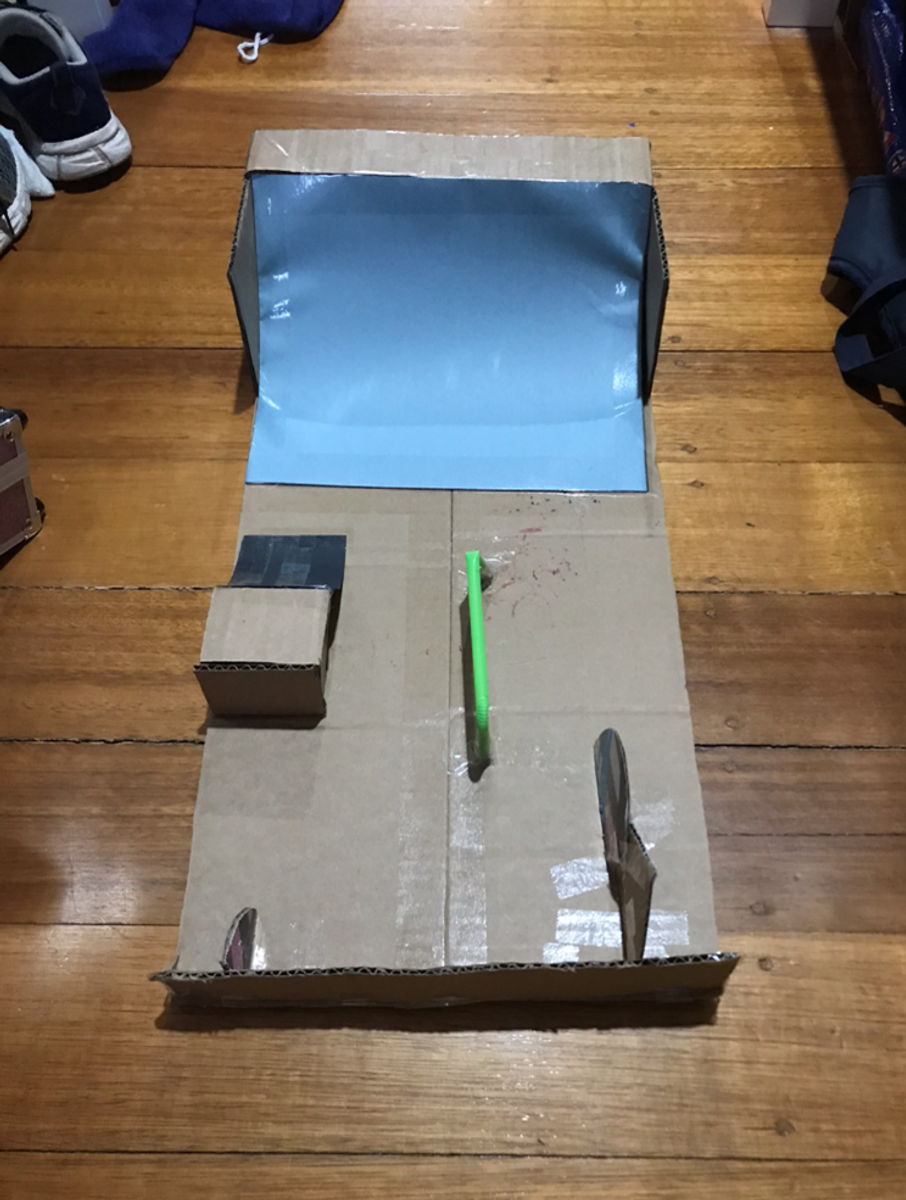
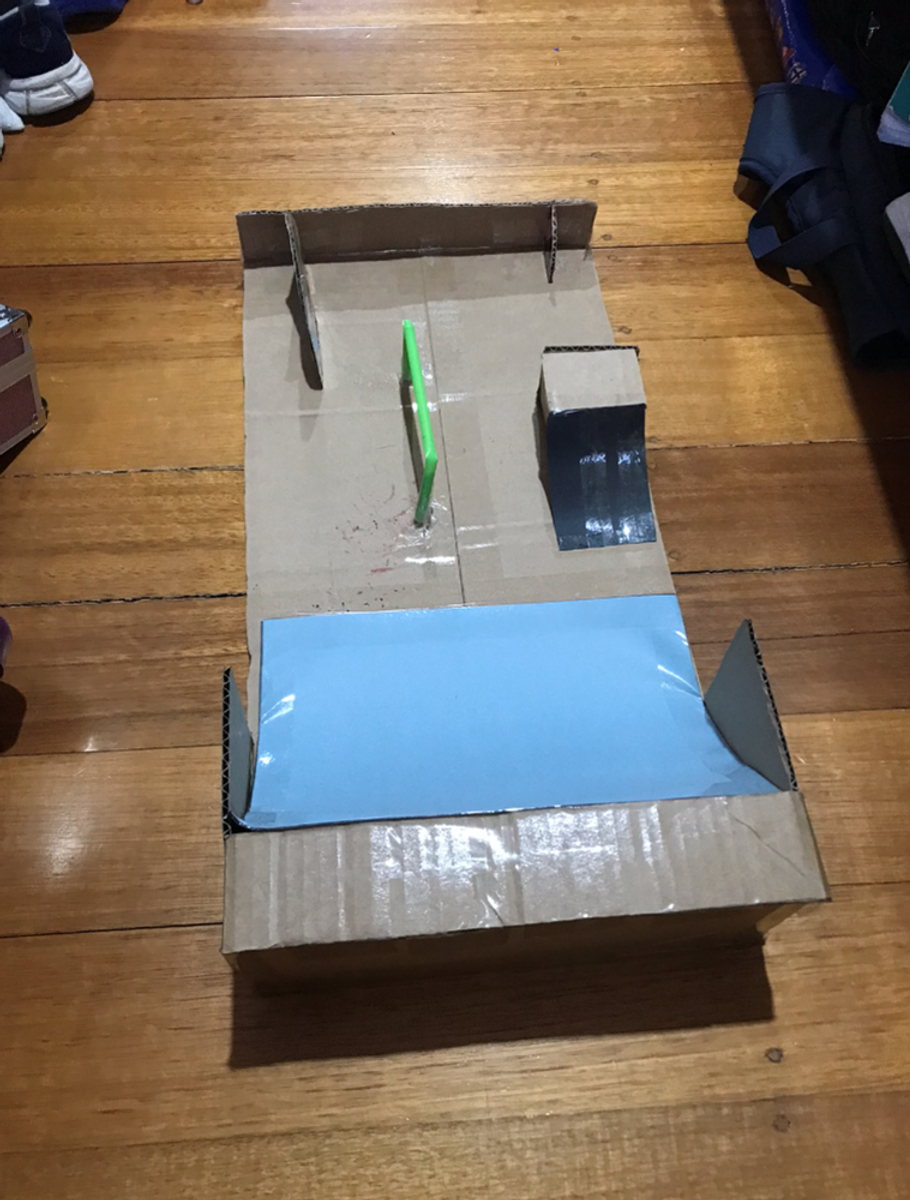
- Cut two large square pieces of cardboard the same size and two longer strips of cardboard to make your large ramp.
- Stick and glue them together so that they hold.
- Doing the exact same as *Step 2* but smaller, make a smaller ramp.
- Repeat *Step 3*.
- Use your pieces of paper to finish the ramp by cutting them to size and making a smooth curve so that it is smooth for the rider.
- Grab your straw and fold each end in 5cm, making sure that it stands up evenly.
- Use sticky tape to stick it to the flat cardboard base.
- Cut out three small random shaped pieces of carboard and place them randomly on the base of the board for the rider to do some extra cool tricks.
- Stick and glue all your pieces on the base and you’re finished.
Production Photos

Evaluation
- What did you enjoy doing the most in this project?
I enjoyed being free throughout this project and having the choice of what I wanted to make. I also enjoyed making it and finishing it as it kept me busy and gave me something to do other than school and cricket.
- What things did you find the hardest about this project?
The hardest thing about this project was probably deciding what I wanted to make. At the start I couldn’t think of anything and then I came up with a few ideas so that made it hard to narrow it down to one, but in the end, I chose and stuck with the mini skate park for my fingerboard.
- What would you do differently next time?
Next time, I would like to be more prepared and have a clearer plan as I sort of just went with the flow of things and decided what I would do in the moment rather than deciding on everything before I commenced the making of this project.
- What new skills did you learn?
I don’t think I learnt any skills but further improved the skills that I already had such as cutting, folding, shaping, gluing, and assembling.
Self-Evaluation
Give yourself a mark out of 10 for each of the following criteria:
* Independence of work - 10
* Quality of the final product - 8

Bridie Groves
Year 10H
Phone Holder
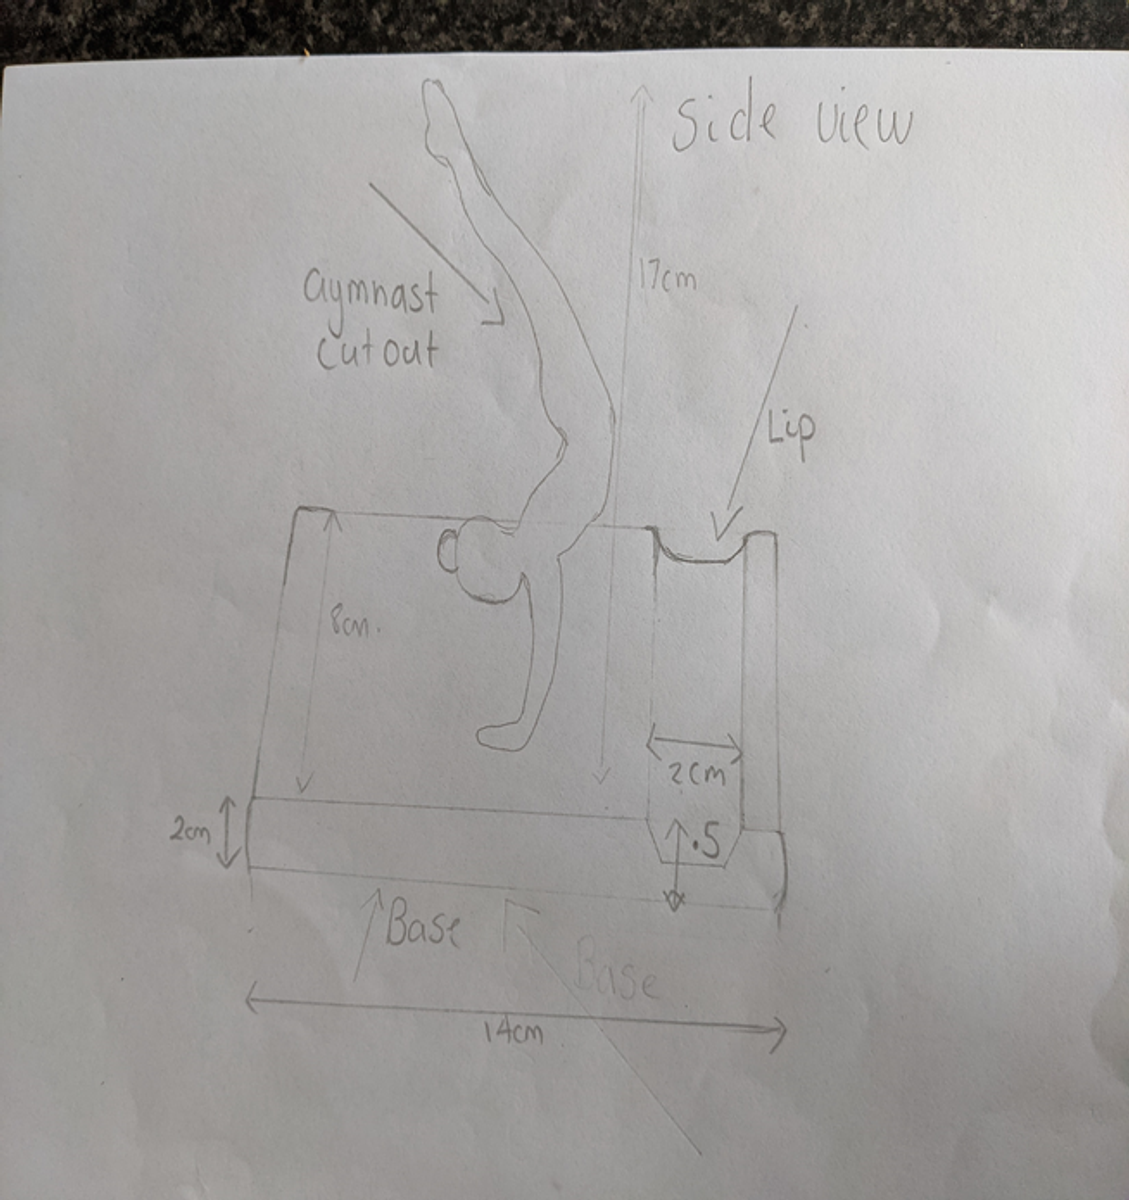
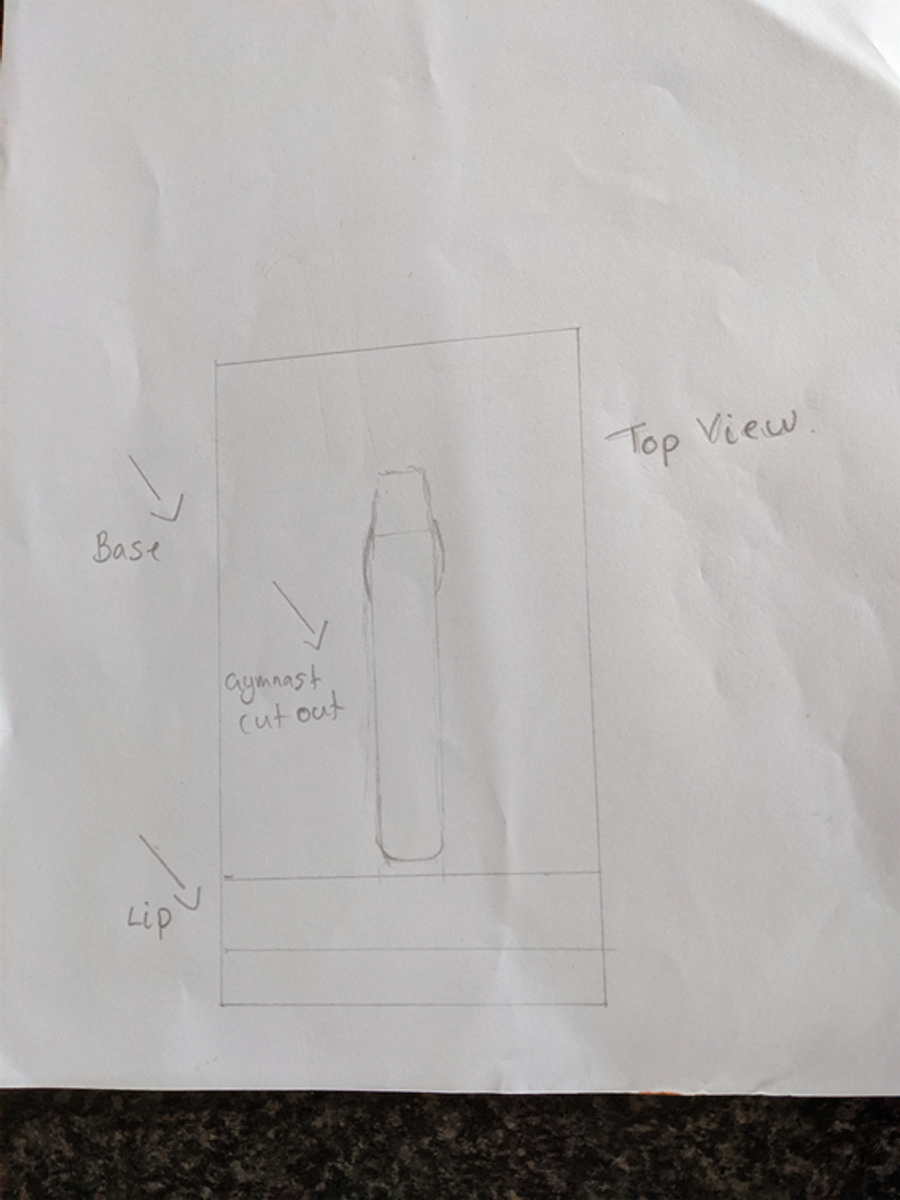
Sketch Side View Top/Side View Top View

Equipment, Materials and Safety Gear
Equipment/Materials Required:
-Treated Pine 2cm in thickness
-Wood glue
-Gymnast Image
-Jigsaw
-Sandpaper
-Felt
-Electric sander
-Electric saw
-Grey led
-Drop saw
-Chisel
-Wooden Mallet
-Ruler/Tape Measure
Safety precautions:
-Cutting/using the jigsaw and drop saw
-Gluing/using wood glue
-Using the electric sander/ be cautious when sanding
-Using chisel (chisel is sharp) be careful.
Safety Gear:
-Safety Goggles
-Shoes
-Earmuffs
-Mask
Finishes:
-Paint
-Paintbrush
Production Plan
Method:
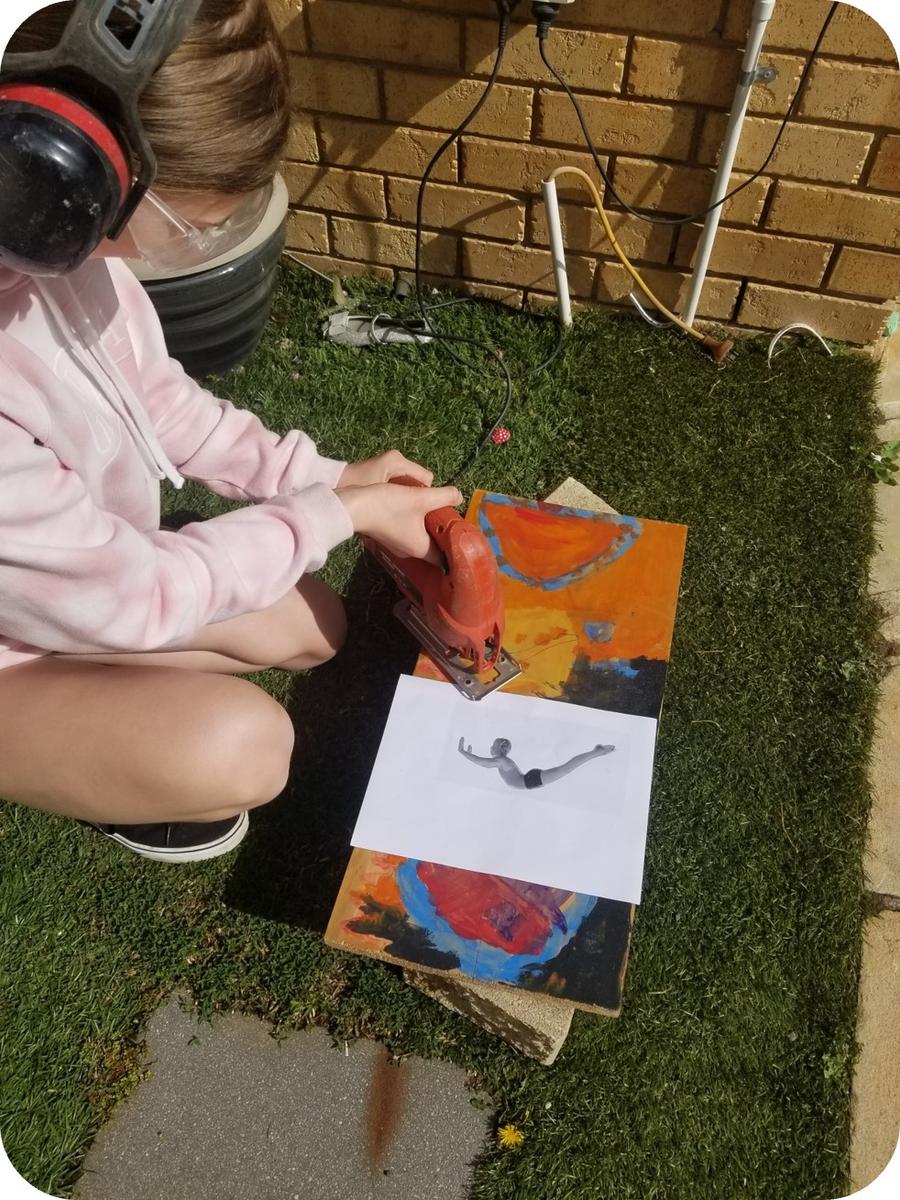
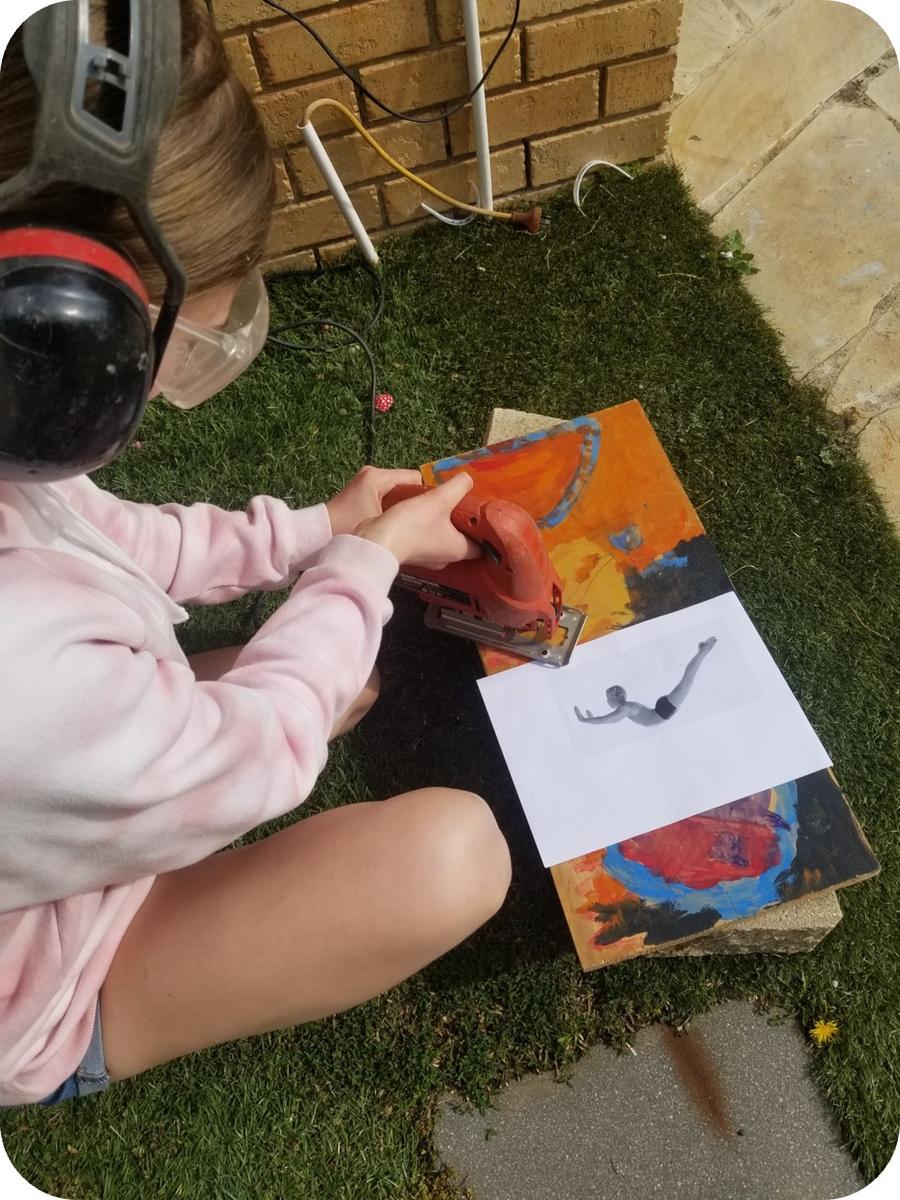
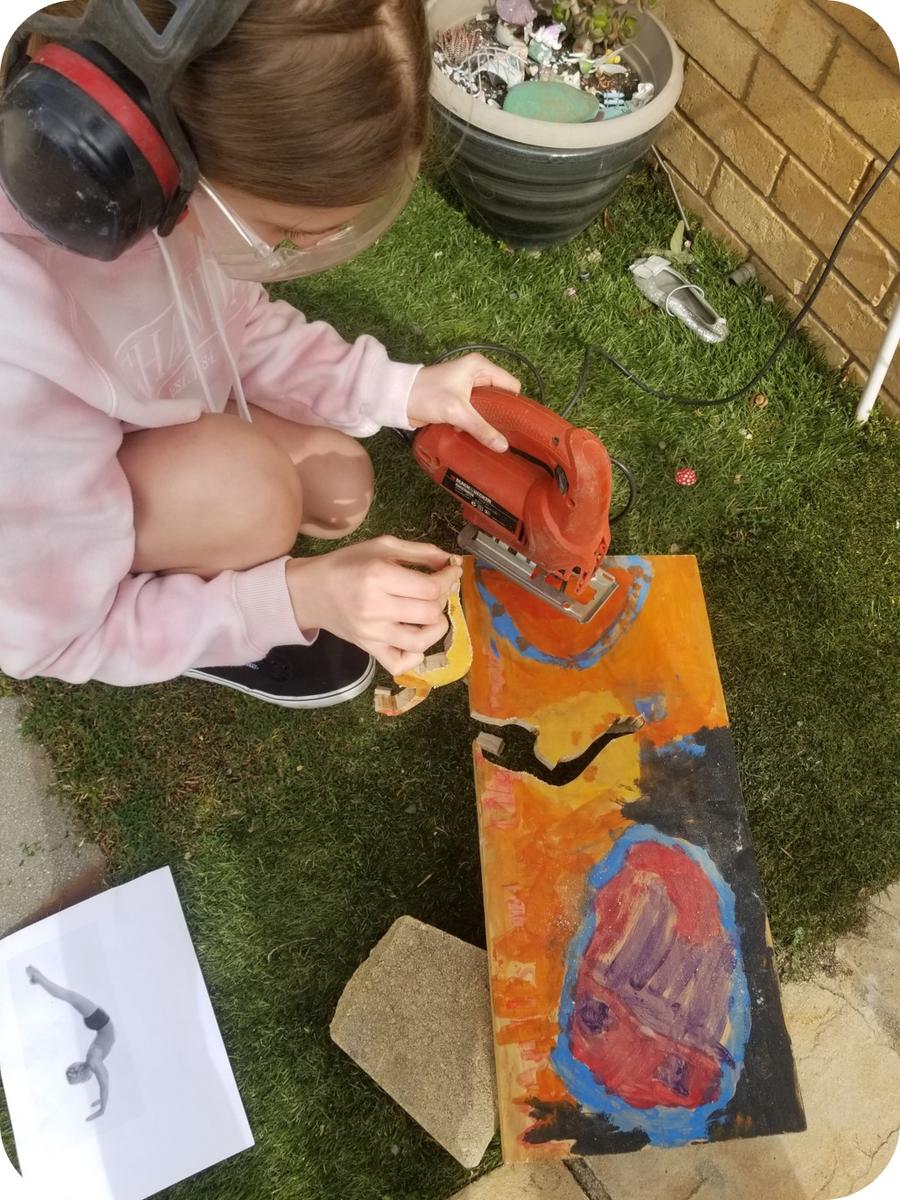
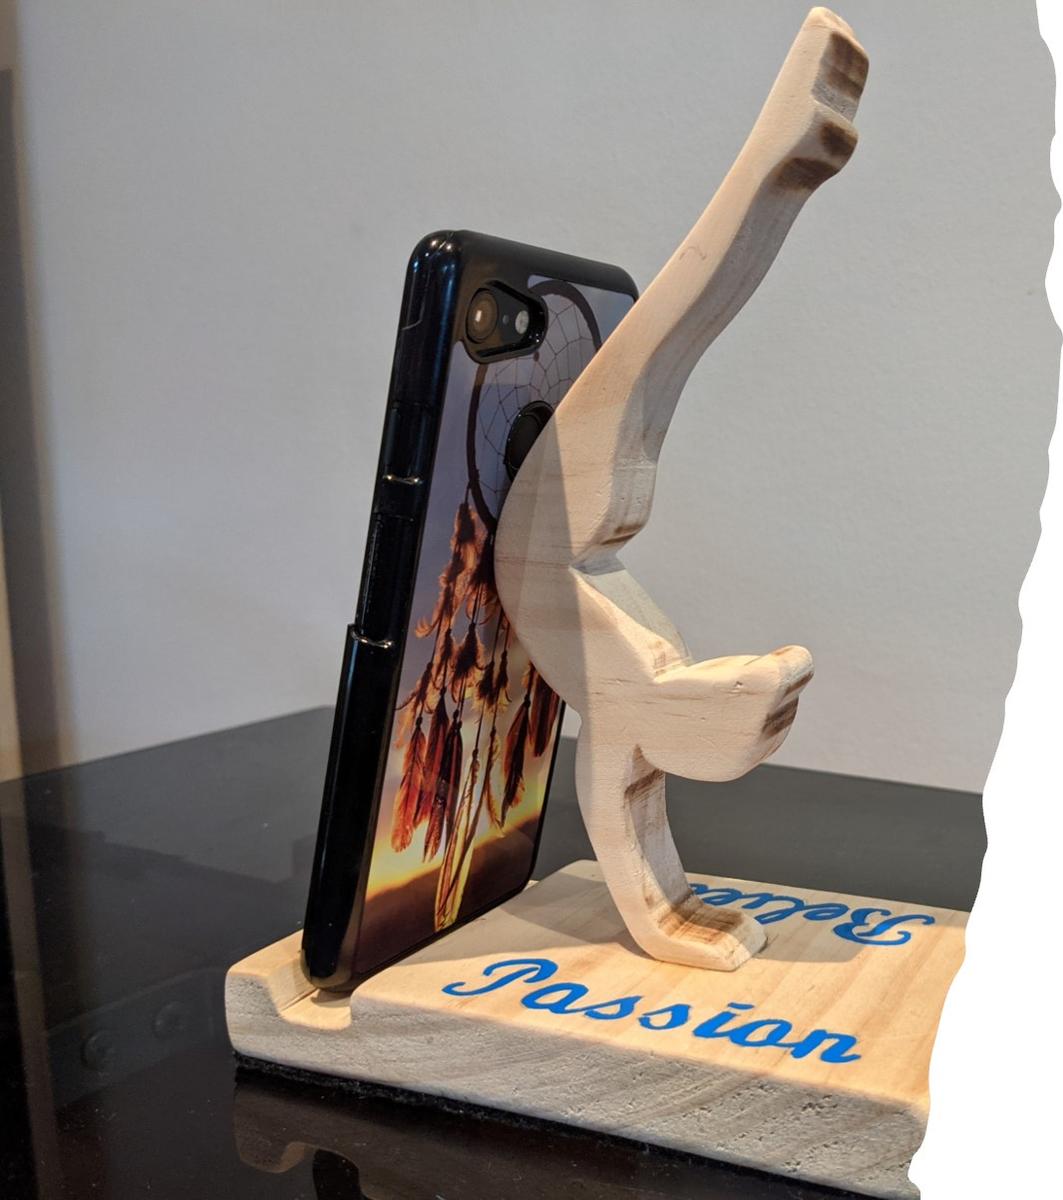
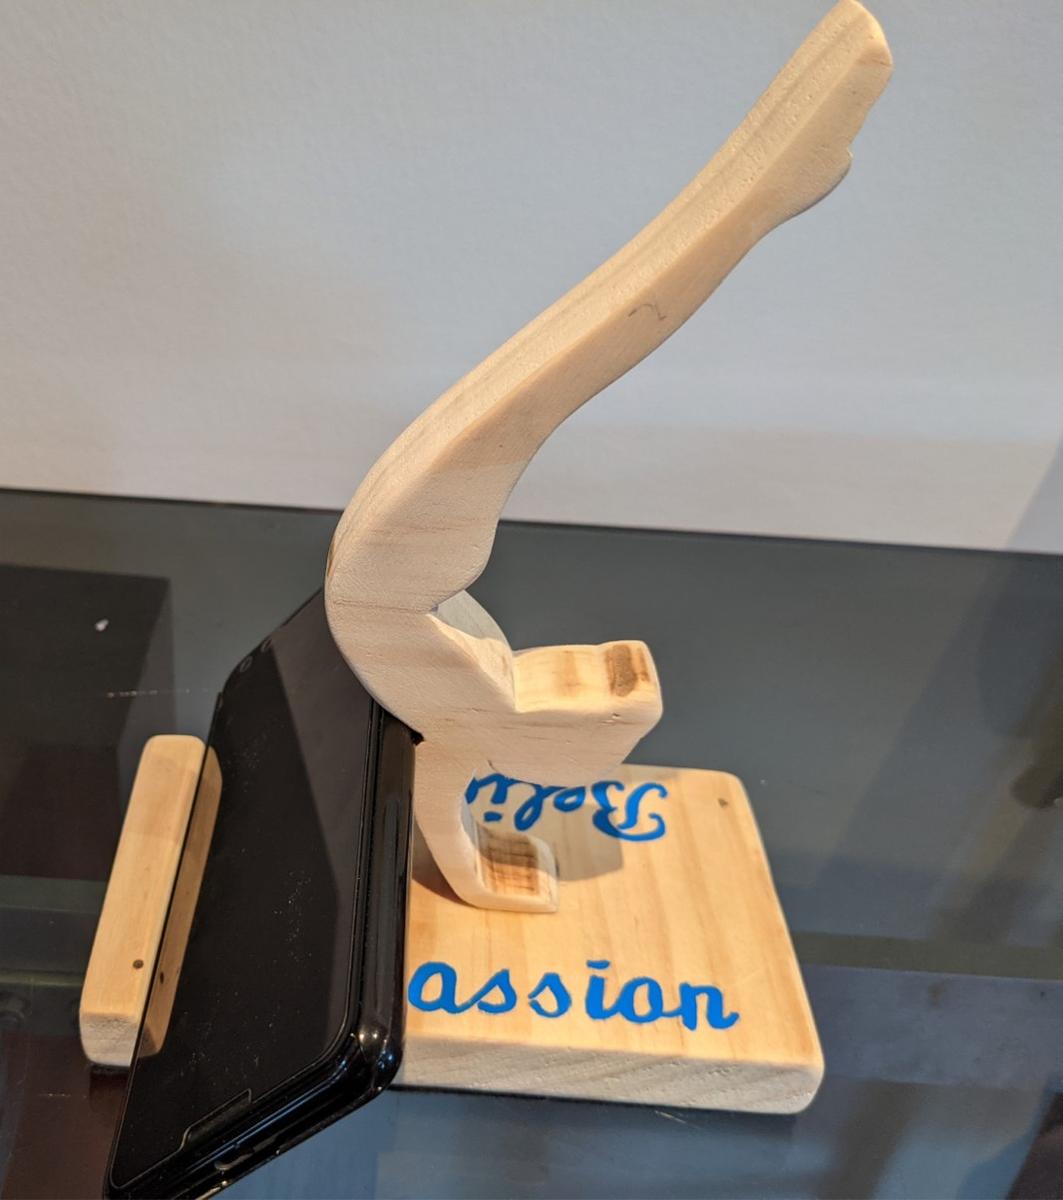
1.Trace template of gymnast onto wood (preferably pine wood)
2.Use jigsaw to cut out gymnast template
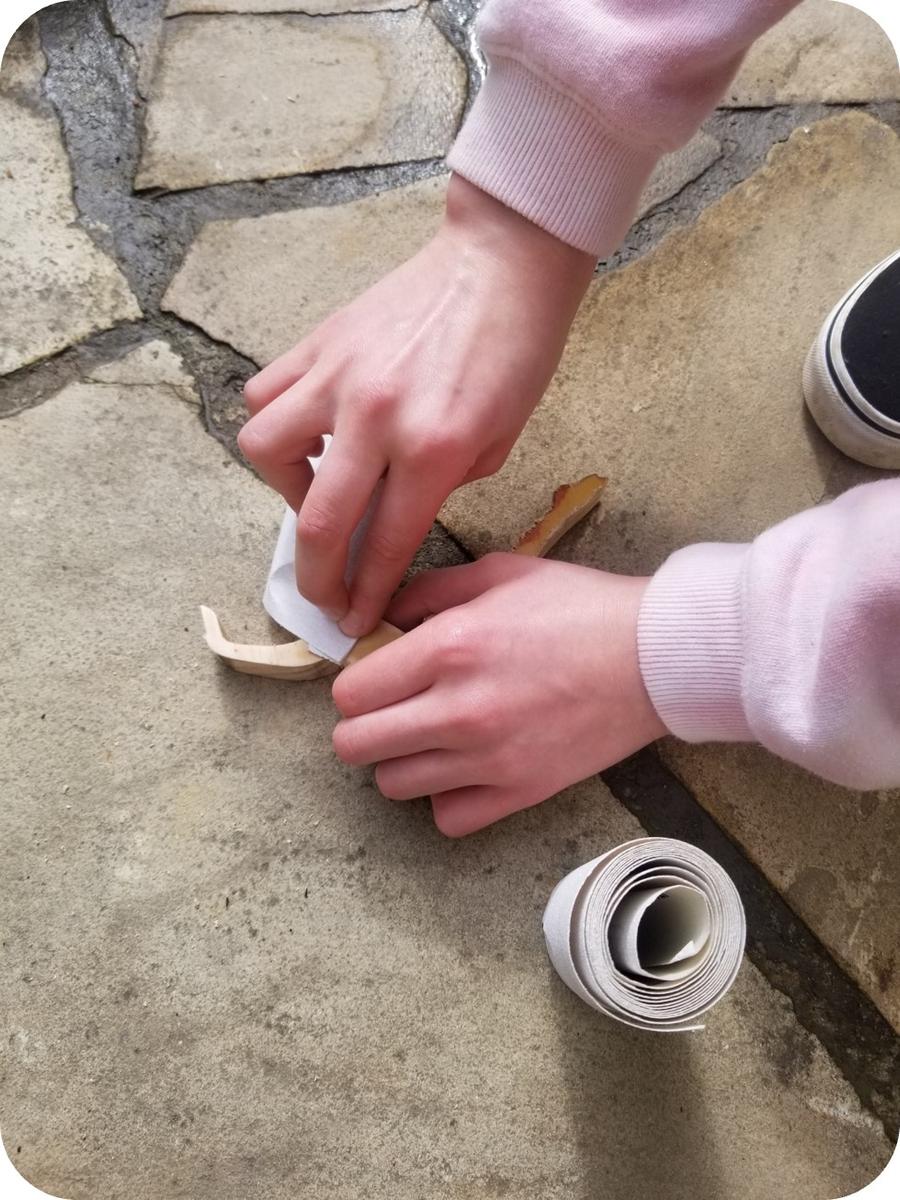
3.Use sandpaper to sand cut out until smooth
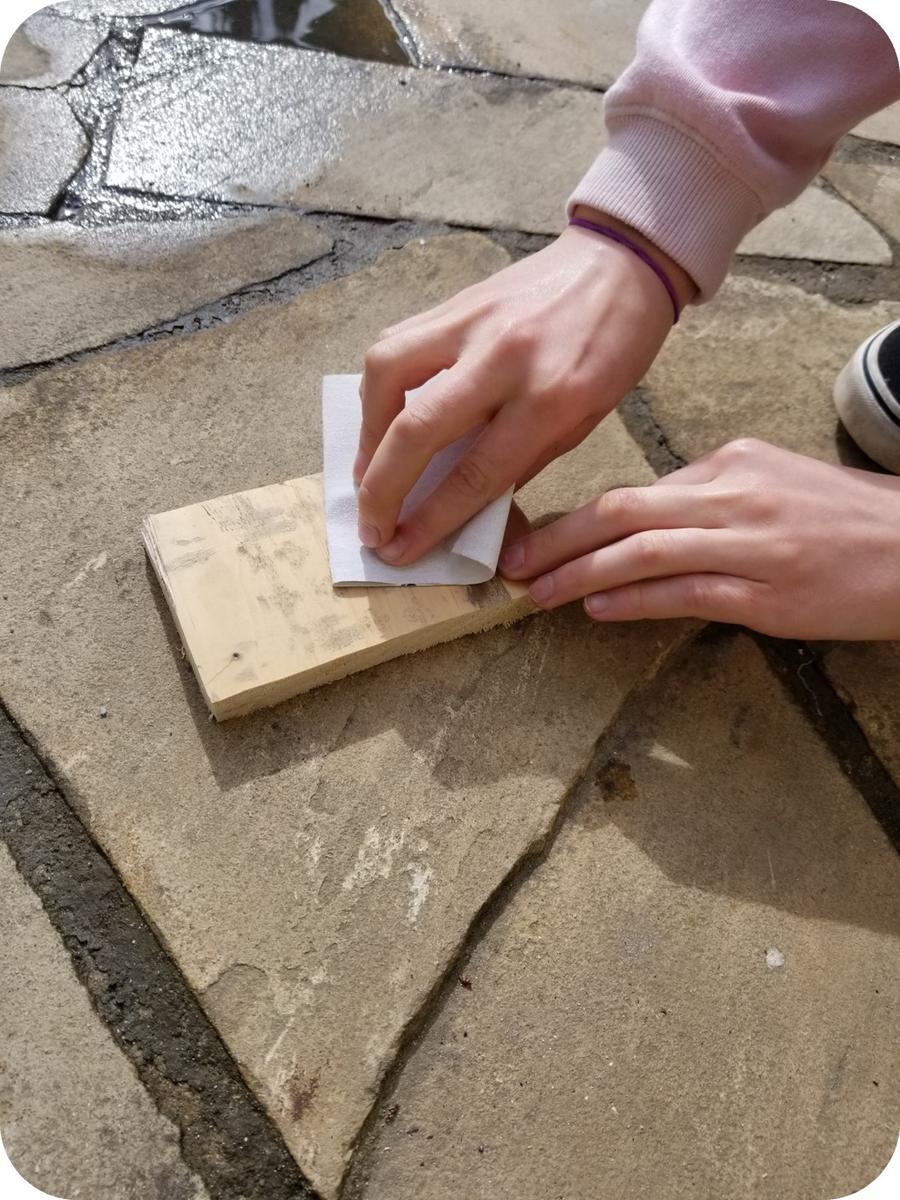
4.Use ruler or tape measure to mark out rectangle (14cm X 8cm) onto a new piece of wood
5.Use drop saw to cut out the rectangle
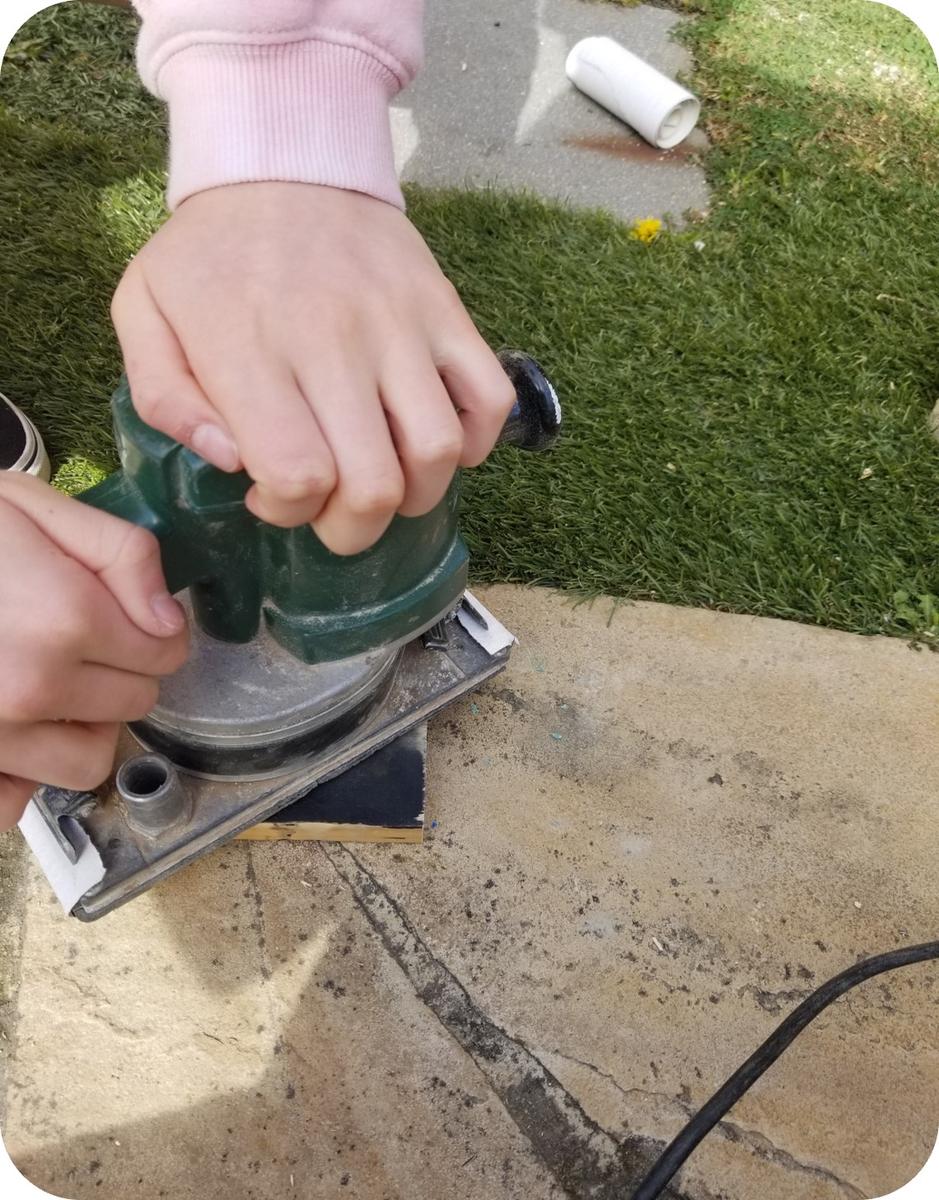
6.Use electric sander to sand the rectangle cut out
7.Use drop saw to cut a lip in the rectangle piece of wood (approximately 1cm in from narrow end at a depth of 0.5 centimeters)
8.Use chisel to get the correct shape then sand the inside of the lip till smooth
9.Sit phone in the cut-out indent, align the gymnast cut out on rectangle and mark where you get the best fit for the phone with a grey led.
10.Measure the size of the rectangle and cut out piece of felt the correct size, glue felt to the bottom of the wood.
11.Use wood glue to stick the gymnast onto the marked area of the rectangle piece of wood.
12.Leave over night to dry.
13.Add any additional décor such as paint, glitter, stickers.
(You don’t have to make a gymnast one, you can make what ever shape you want)
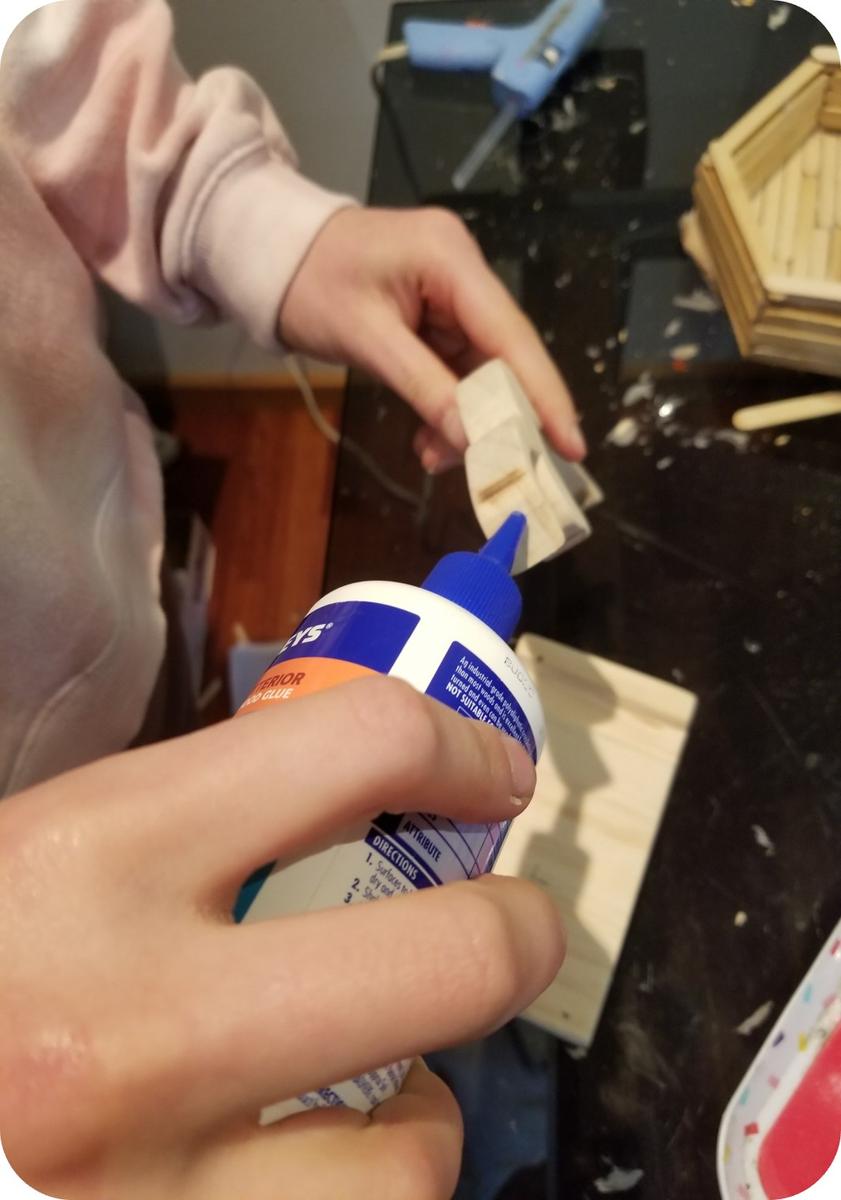
Photos along the way
The Finished Product


Evaluation Information
What did you enjoy doing the most in this project?
I enjoyed everything about this project, however my favourite part was using the jigsaw to cut out the gymnast shape. I also loved sanding the wood pieces and painting some details on it. I loved when I got to test it out and see if it worked.
What things did you find the hardest about this project?
I found it hard to stay on the lines and cut out the correct shape when I was using the jigsaw. I also found It difficult to be accurate when I was painting onto the wood.
What would you do differently next time?
If I were to create this phone holder again I would drill a hole in the rectangle for a spot to hold a pen. I would also add another lip on the other side for a spot to have a note book.
What new skills did you learn?
During this project I learnt and enforced multiple skills. Those skills consist of measuring, ruling, cutting, assembling, gluing and sketching. I learnt how to use a jigsaw and a drop saw. I also applied my skill of painting.
Self Evaluation
*Independence of work (1 - Someone else did all the work…….. 10 – You did all the work).
For independence of work, I give myself an 8
*Quality of the final product (1 - Poor……... 10 – Excellent).
For the quality of the final product, I give myself a 10.

Molly Sawyer
Year 7B
Clothespin Swing Chair
Production Plan
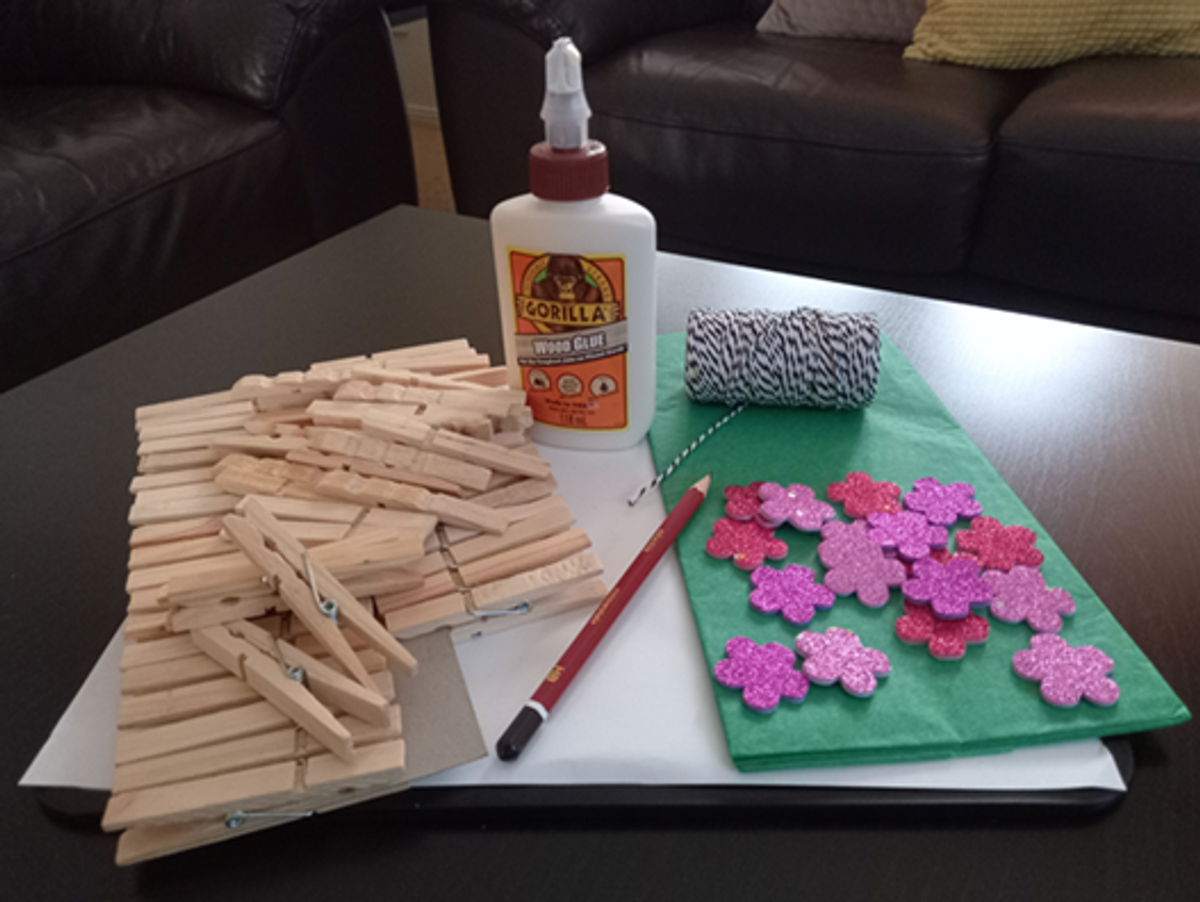
I’ve decided for my technology happy challenge to make a clothespin swing chair. The tools and equipment needed for this project are:
- Wooden clothes pegs (x40)
- Wood glue
- Pencil
- String
- Decorations – green tissue paper, paddle pole sticks and colored flower glitter stickers
Safety precautions that you need to be aware of are to be careful when taking out the metal springs from the pegs so that you don’t cut yourself. Also, when working with wood glue, make sure that you are only using a little and not sticking your fingers together.
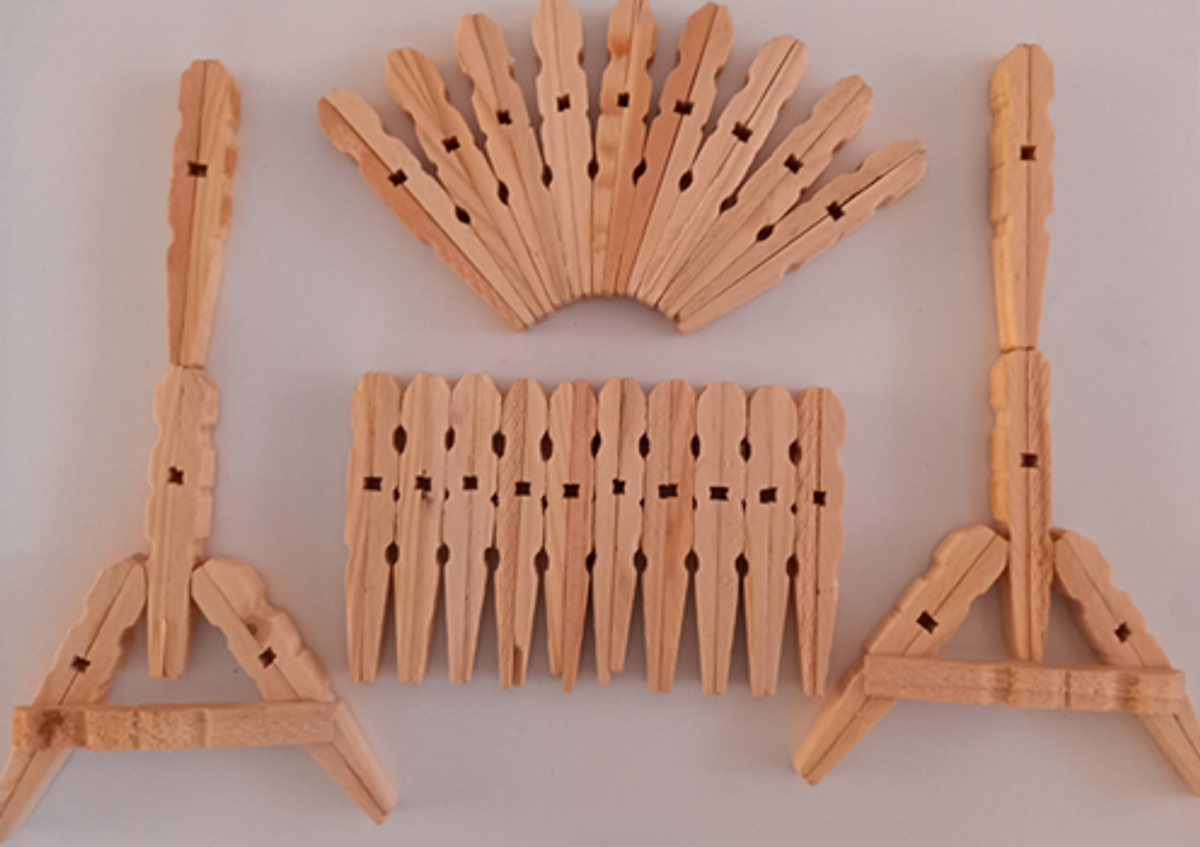
To begin making the clothespin swing chair follow the steps below:
- Take 40 wooden pegs and take out the metal springs
- Using your glue, you need to glue the pegs back-to-back as a set (x31)
- To make the frames for the swing, glue 2 peg sets 1 on top of each other
- Take another 2 peg sets and glue on either side of the above, to make your legs
- Next take 3 single pegs and glue 1 on either side of your frame and the other across the bottom of your legs to make your frame strong
- Do the above step for the other frame
- To make the chair seat you need to connect 10 peg sets and glue them together
- To make the chair backing you need to connect 9 peg sets at their pointy ends with your glue, to make an arched and curved back
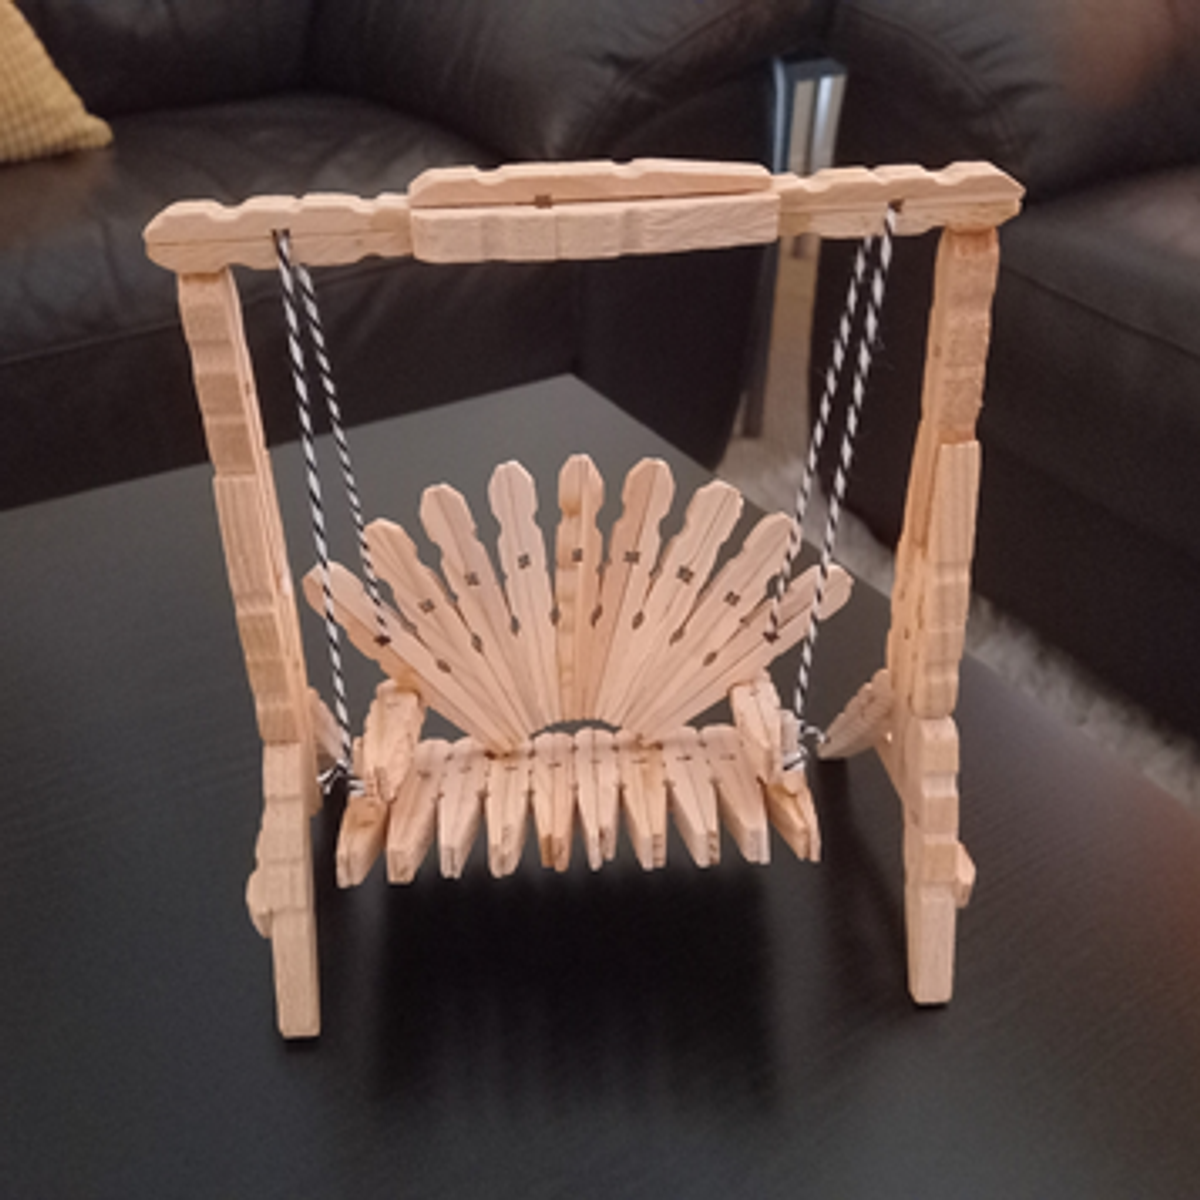
- Next you need to connect your legs into one complete frame
- Take 2 peg sets and glue each at the top of your legs facing inwards
- Then take 3 single pegs and with your glue, glue 1 on top and the remaining 2 on either side to connect your frame together. Now your frame is complete
- Now attach with glue your curved seat backing to the seat, making sure that it is centered
- Next is to make your 2 arm rests for your chair. Firstly, you need to cut 2 singles pegs on its pointy side in half, to be left with 2 pieces of wood about 5cm long

- Take your pieces of wood and glue them each to a peg set. Now glue these arm rests to your chair on either side
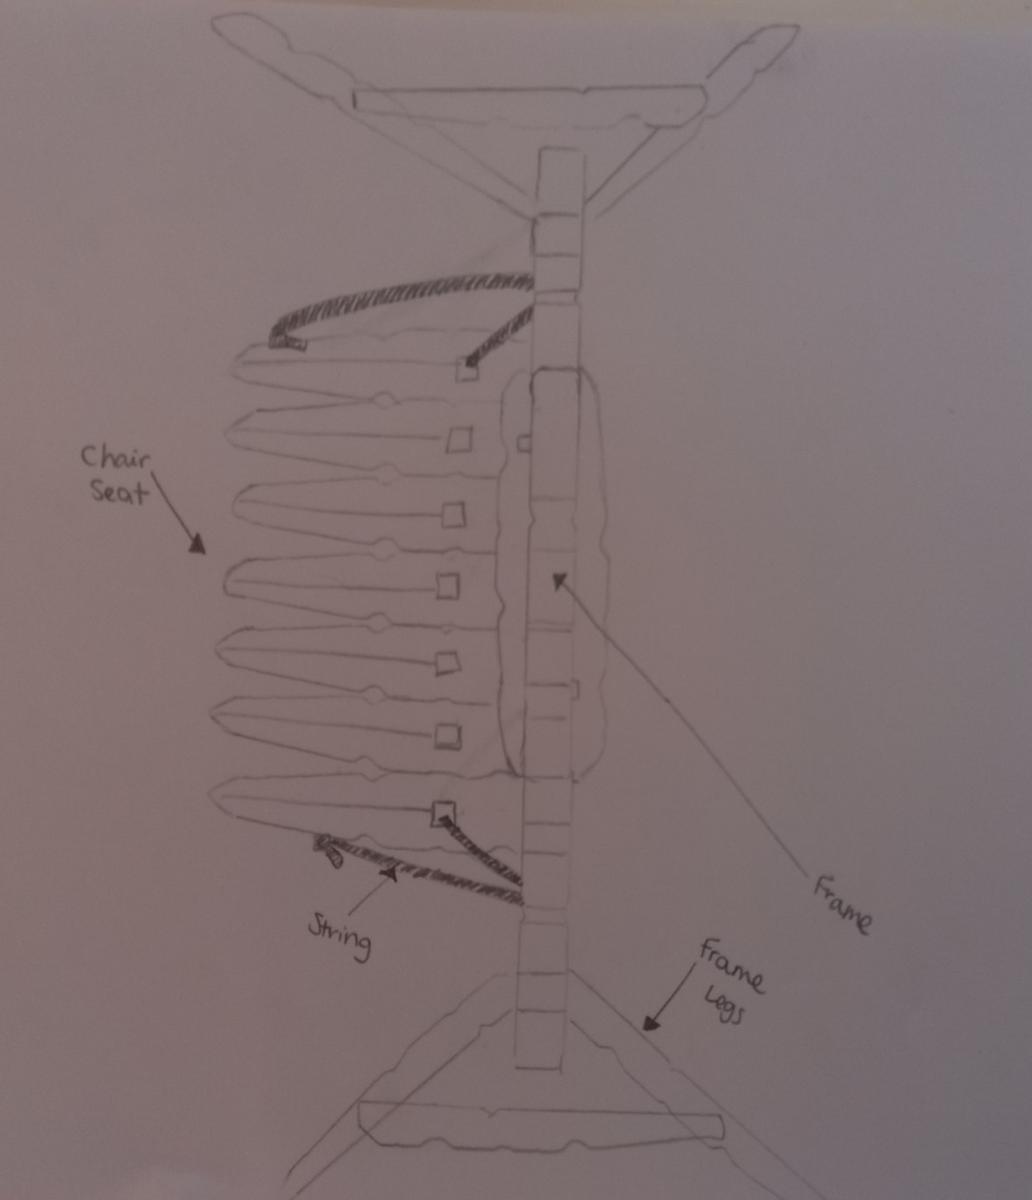
- Now you should have your chair complete and your frame too. Using your string, connect your chair to the frame
- Finally, your swing chair is complete and is now ready to be decorated
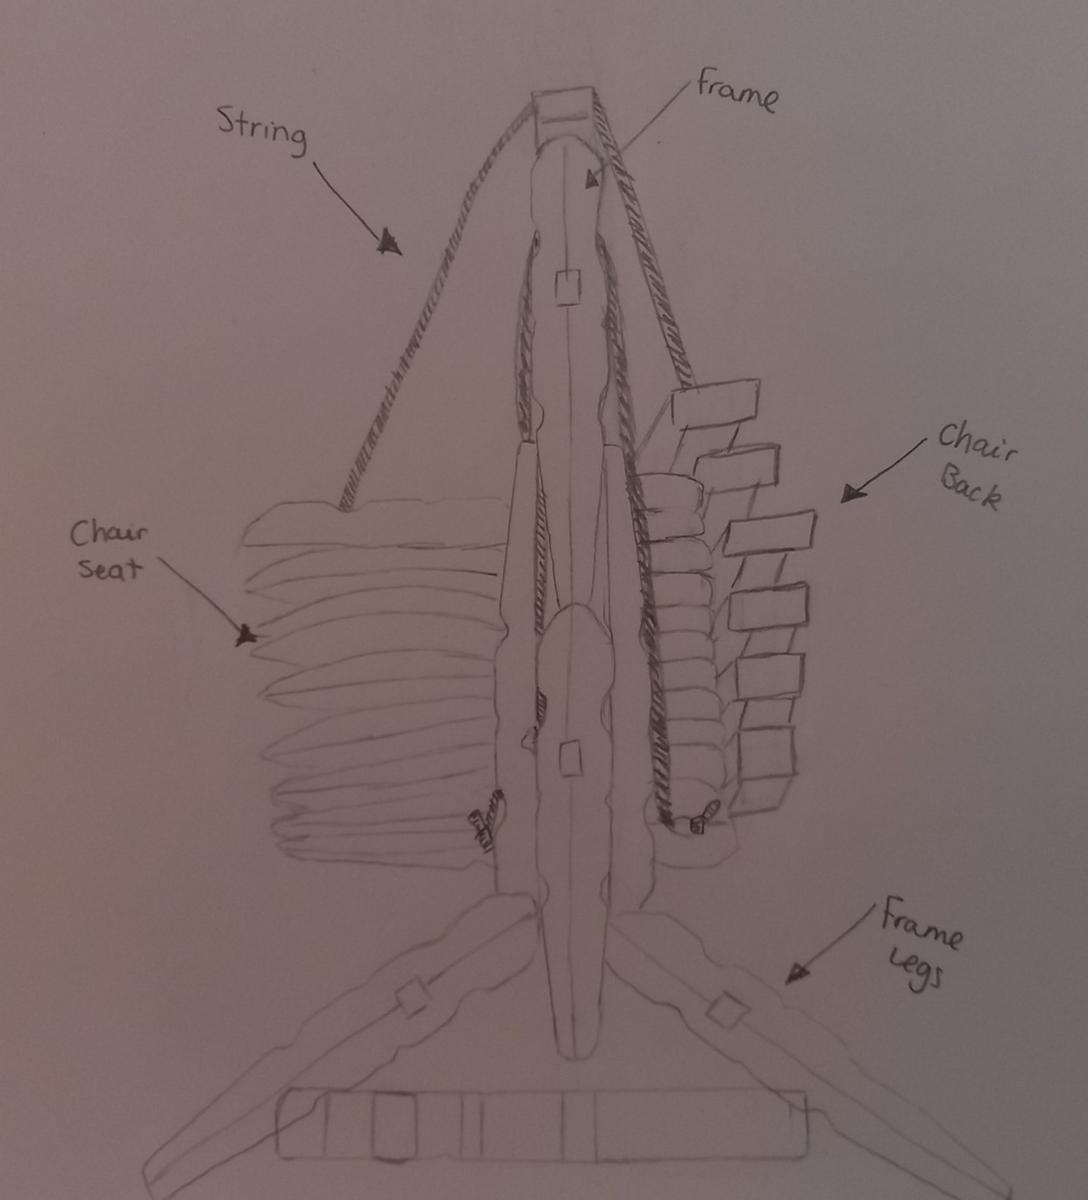
Pencil Sketches
Side View Front View Top View

Evaluation & Self Reflection
1. What did you enjoy doing the most in this project?
I enjoyed the whole project and making the clothespin swing chair come to life.
2. What things did you find the hardest about this project?
The hardest thing about my project was gluing the wooden pieces together. My glue was not strong enough to hold the pieces together, so I spent a lot of time holding the pieces in place until the glue dried.
3. What would you do differently next time?
Next time I would use super glue that would connect my pieces faster and stronger.
4. What new skills did you learn?
New skills I learnt were that any household items like the wooden pegs, can be turned into pieces of furniture with some though and effort.
Independence of work: I give myself 9 – 10
Quality of the final product: I give myself 10 -10

Rianna Petkovski
Year 7F