
Helpful Hints
If you have any ideas that you would like to share to help other parents with learning sight words or if you have any amazing and easy recipes for healthy snacks or lunches, please send them to kthompson@arm.catholic.edu.au and we will include them in the next newsletter. After all, Sharing is Caring!
Fun & Interactive Games to help your children with their sight words.
The 7-Day Plan
Day 1: Flashlight Tag. Stick 5-10 word cards around a darkened room. Call out a word, and have your child "tag" it with their flashlight beam as fast as they can.
Day 2: Sticky Note Scavenger Hunt. Hide sight words written on sticky notes throughout one room. Give your child a "master list" and have them find and match each hidden note to its twin on the list.
Day 3: Shaving Cream Writing. Spread a thin layer of shaving cream (or whipped cream) on a cookie sheet. Have your child write their sight words using their "pointer finger pencil," then "erase" with a swipe to try the next one.
Day 4: Sight Word "Splat". Lay word cards on the floor. Give your child a fly swatter (or just their hand). Call out a word and watch them "splat" it with lightning speed.
Day 5: Musical Sight Words. Place cards in a circle on the floor. Play 30 seconds of their favourite song while they dance around. When the music stops, they must read the word they are standing on.
Day 6: Drive-In Parking Lot. Draw a "parking lot" on a large piece of paper with a sight word in each space. Have your child park their toy cars in the "spot" you call out.
Day 7: Magic Reveal Art. Use a white crayon to write words on white paper. Let your child paint over the paper with watercolours to "magically" reveal the hidden words as they read them aloud.
2. Savoury Snacks
- Vegetable Sticks & Dip: Carrot, cucumber, celery, or snow peas with hummus or tzatziki.
- Cheese: String cheese, cheese cubes, or cottage cheese.
- Hard-Boiled Eggs: A great protein-packed, budget-friendly option.
- Air-Popped Popcorn: Light, crunchy, and high in fiber.
- Roasted Chickpeas: High in iron and fiber.
- Homemade Savoury Muffins: Zucchini, corn, and cheese.
- Biscuits or Crackers: Paired with cheese or hummus.

St Patrick's Day Craft Ideas
It’s almost time for the "wearing of the green!" You don’t need a pot of gold or a trip to the craft store to make some St. Paddy’s magic. Most of these use items you likely already have in your kitchen or recycling bin.
Here are three low-stress, high-fun crafts for parents and kiddos:
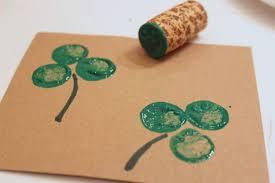
1. The Wine Cork Shamrock
If you have a stray wine cork (or even a marshmallow!), you have a perfect stamp.
- Resources: 1 wine cork, green paint, and paper.
- The How-To: 1. Dip the end of the cork into green paint. 2. Stamp three circles in a cluster so the edges touch. 3. Use a marker or a paintbrush to draw a small stem at the bottom.
- Why it's great: It’s tactile, quick, and makes for great handmade cards to mail to grandparents.
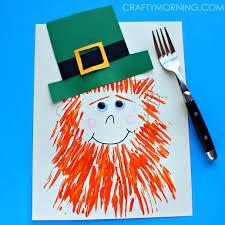
2. Fork-Painted Leprechaun
Forget the expensive brushes—grab a plastic or metal fork from the kitchen drawer to create a wild, textured orange beard.
- Resources: A paper plate (or paper cut into a circle), orange paint, a black marker, and a scrap of green paper for a hat.
- The How-To: 1. Draw a simple face on the top half of your paper circle. 2. Dip the tines of the fork into orange paint. 3. Press the fork down repeatedly around the bottom half of the face to create a "scruffy" beard. 4. Cut a simple square hat out of green paper and glue it on top.
- Pro Tip: If you don't have green paper, just color a piece of white paper green with a crayon
3. Paper Loop Rainbows
St. Patrick’s Day isn't just about green; it’s about finding that rainbow.
- Resources: Construction paper (various colors), glue or a stapler, and two cotton balls (optional).
- The How-To: 1. Cut strips of paper in rainbow colors (approx. 1 inch wide). 2. Glue the ends of the strips together to form a "bridge" or arch. 3. Glue the "clouds" (cotton balls or white paper circles) to each end of the rainbow.
- The Result: These look adorable sitting on a windowsill or a dining table.